VTEX INTEGRATION USER GUIDE
REGISTRATION
To register, first go to the integration’s page:
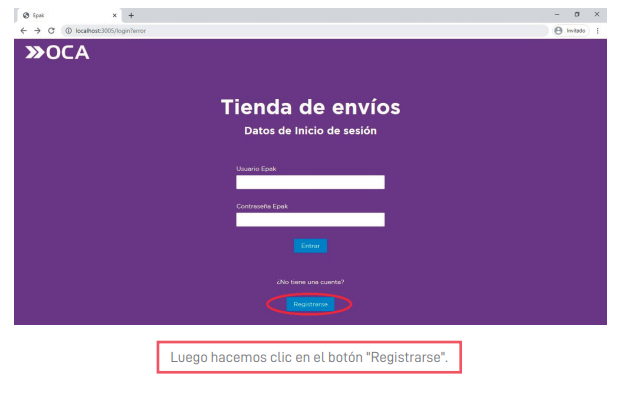
Then we click on the “Register" button.
Then you will be directed to the registration screen:
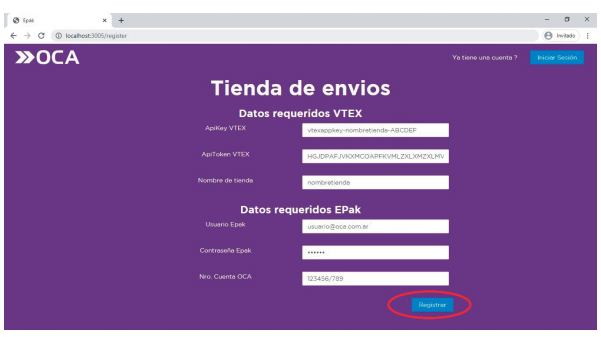
Fill in the form with the data previously obtained from VTEX 1 and click on the “Register” button. The data will be validated and if they are correct, you will be directed to the Set branch offices of origin screen.
SET BRANCH OFFICES OF ORIGIN
Next, fill in with the information of our branch offices, from which you want to make the shipment of our products to the clients in VTEX. To add more than one branch office, click on the “Add Branch Office” button.

After filling in the data, click on Save.
VTEX DATA CONFIGURATION
On this screen, you will select the data configurated at VTEX to administer the shipments.
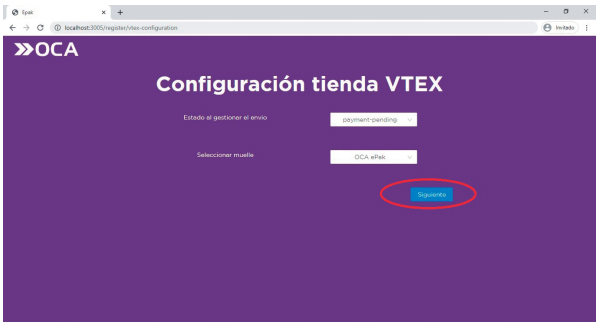
Select the status at which you will later administer the shipment. This status corresponds to the status of our store’s purchase orders. Possible statuses include: “Payment still pending”, “Already invoiced”, “Payment Approved”, “Ready to be shipped”, among other statuses 2. When a client makes an order and this order is at the selected status, you will be able to see it on our shipment confirmation screen, which we will see later. As regards the dock 3, select the dock created in VTEX 4 which corresponds to OCA’s shipments. Click on the “Next” button.
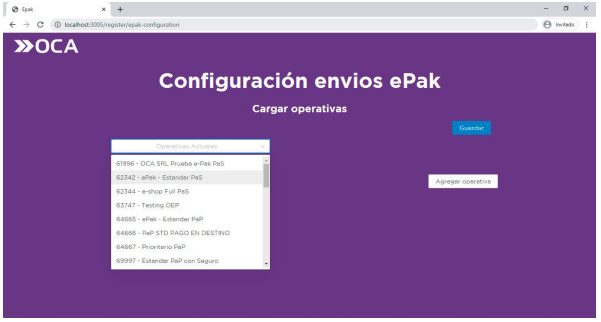
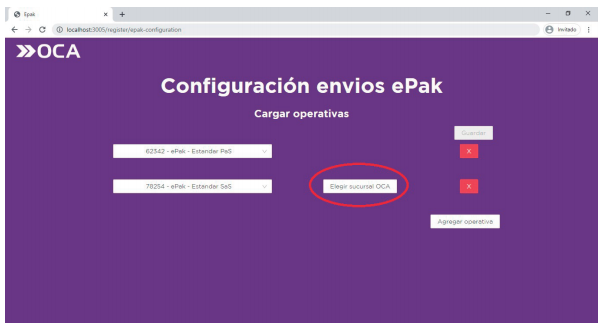
EPAK SHIPMENTS’ CONFIGURATION
On this screen, select the operations by default (when the shipment is confirmed, you’ll be able to change the operations) that will appear in VTEX as shipment policies or strategies (also referred as carriers 5) and, in case of choosing an operation that origins at door (a door-to-door or door-to-branch operation), this will be associated by default with the different branches of origin that we have already set at the “Set branch offices of origin” screen.
If you select an operation which origin is “OCA branch” (Branch-to-Branch or Branch-to-Door operation), the “Choose an OCA branch” button will pop up.
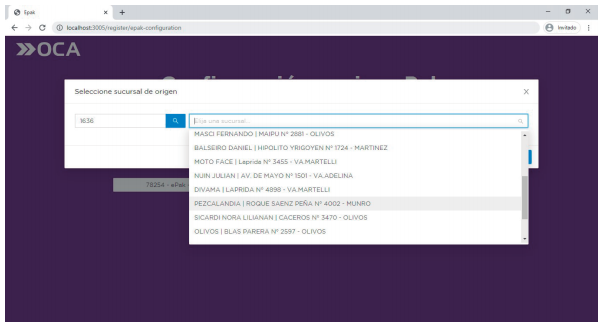
When clicking on this button, a window will pop up where you will have to place the Zip-Code that corresponds to the OCA’s branch to which you will deliver the products; then OCA will deliver the products to another branch (SaS operation) or to a particular address (SaP operation). Next, choose the branch by default from the drop-down list.
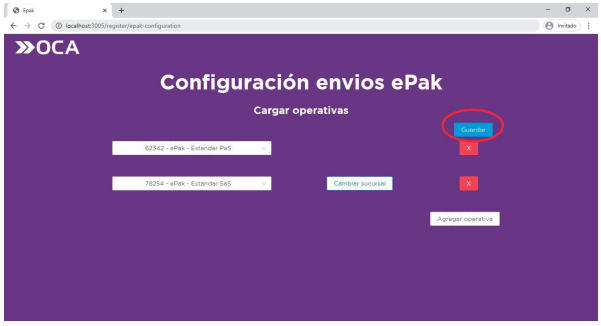
Click on “OK” and then you will be able to add another operation by clicking on the “Add an operation” button. If you do not have to add any other operation, click on the “Save” button.
At this point, the registration has already been completed and you’ll be redirected to the Login screen. Now you can start administering the shipments on this page.
LOGIN
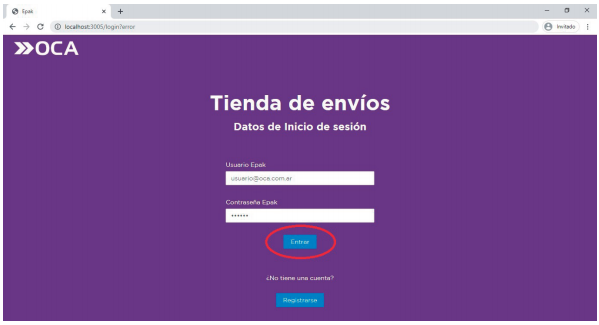
Use OCA’s username and password, previously registered on the registration screen, to login and then click on the “Login” button.
Once you have login, you will be able to administer the shipments of the products that are on our VTEX store.
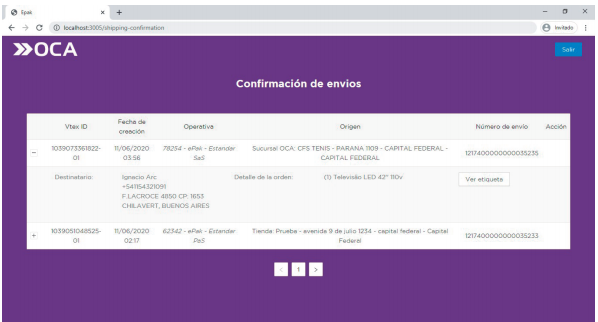
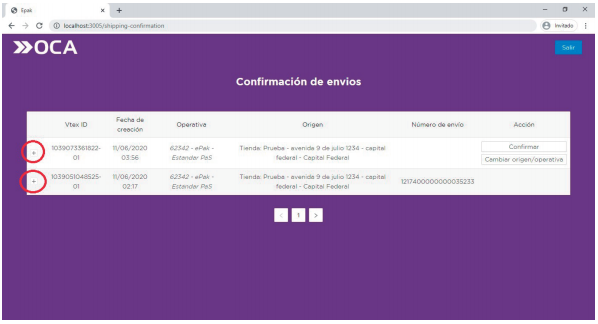
SHIPMENTS’ CONFIRMATION
On this screen you will see the shipments that are pending confirmation. They will be at the status previously selected on the VTEX Data Configuration page. Here you will see the information of the shipment’s order that the clients generated when they purchased one of the items at our VTEX store.
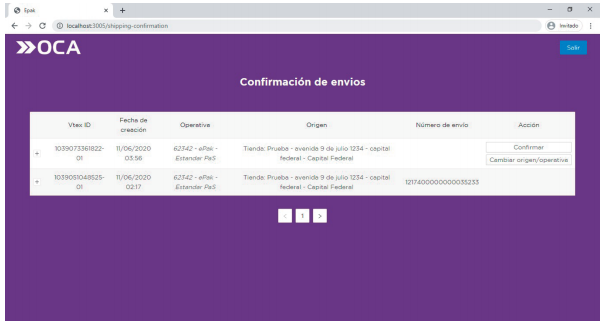
- Vtex ID: Unique identifier of VTEX order.
- Order’s creation date.
- Operations: It is one of the operations by default that we have changed.
- Origin: Corresponds to the branch of our OCA’s store or Branch office (by default) in which our products must be available and which we can change using the change origin/operation button.
- Tracking Number: If the shipment has been confirmed, this number will be provided, which corresponds to the shipment.
- Action: By clicking on "Confirm", we confirm the shipment at OCA and a tracking number is
generated.
By clicking on origin/operation, a window will pop up which we’ll see later with more details.
Change origin/operation
If you wish to change the operation or the origin, you must click on this button and this window will pop up:
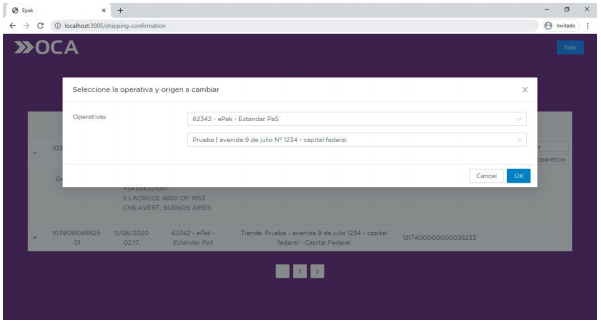
On the first pull-down menu you can see all the operations that you can select to change the default operation (which you have chosen previously when you configured ePak shipments). On the second menu, you will see the different origins which, depending on the operation, will be our store’s branch offices or OCA’s branch offices.
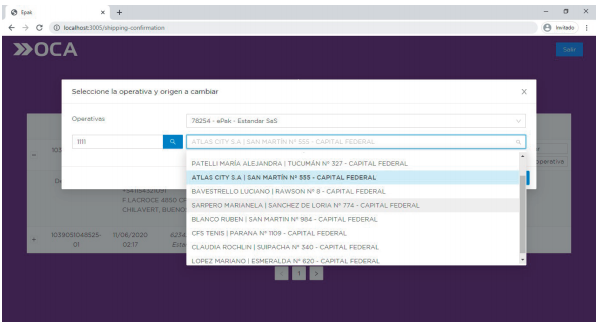
On the sample image you have our store’s branch office under the name “Prueba” (set at the Set branch offices of origin screen). You can change it by selecting another of our branches or by changing the operation (Door-to-Branch, for instance, 62342 Estándar PaS) to a Branch-to-Branch operation (for example: 78254 Estándar SaS) and choosing an OCA’s branch as origin (Note: we cannot change the type of destination of the operation, as the client has chosen to receive the item at an OCA branch office or at their house). In this case, a pull-down menu and a Zip-Code will pop up so that you can select an OCA’s branch office as shipment origin.
Then click on “OK” and you’ll get to see all the modifications made on the corresponding shipment order:
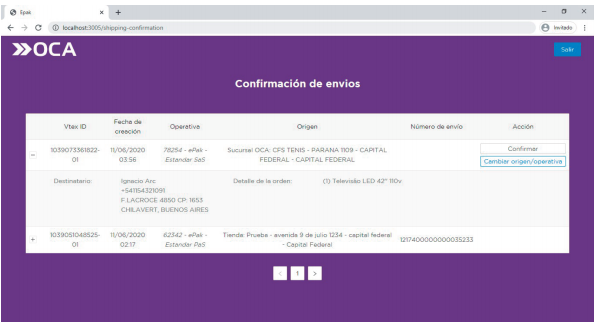
If you want to confirm an order, click on the “Confirm” action button and wait until you receive the tracking number.

This shipment is finally confirmed and the client will also be able to track it at VTEX.
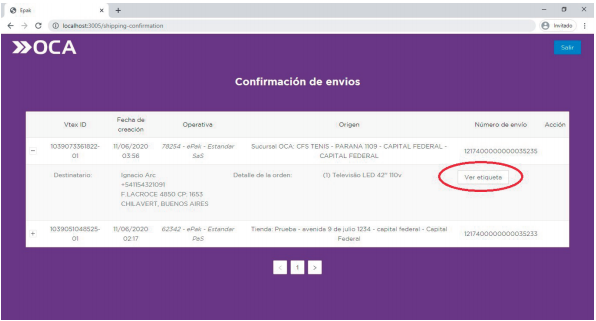
Details of the Shipment Order
To see the shipment order’s details, you have to click on the [+] button which you can see on the image:
This will allow you to see the addressee’s information, the address, VTEX order’s details and, if the order is confirmed, you will see the label and will be able to print it. In order to see the label, click on the “See Label” button:
A new browser window or tab will open with the label(s) that corresponds to the shipping order:
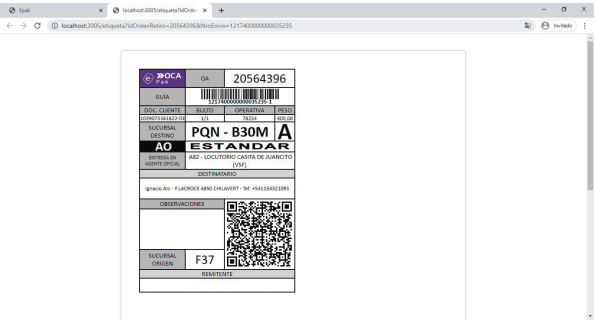
Then click on the label by pressing the right mouse button, then go to the menu and click on “print”:
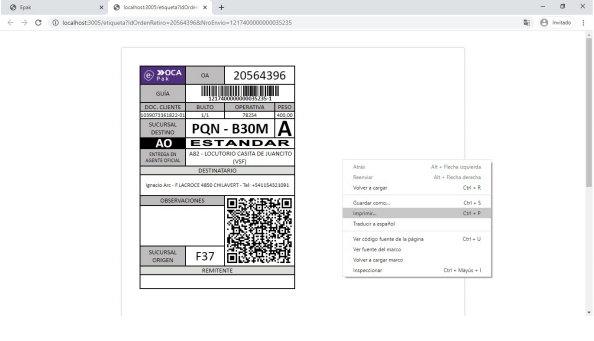
Then choose the printer and click on “print”.
USEFUL LINKS
Vtex
- Inventories & Shipments
- Tutorials
- First Steps
- https://developers.vtex.com/docs/getting-started-authentication "Obtener apiKey & apiToken VTEX".
- https://help.vtex.com/tutorial/flujo-de-pedido-en-el-oms?locale=es Estados en VTEX.
- https://help.vtex.com/tracks/logistica-101--13TFDwDttPl9ki9OXQhyjx/4Rr5XpzAzUPv2Eo9Mh7cEj ¿Que son los muelles?
- https://help.vtex.com/tutorial/como-crear-muelle--7K3FultD8I2cuuA6iyGEiW Como crear un muelle en VTEX.
- https://help.vtex.com/tracks/logistica-101--13TFDwDttPl9ki9OXQhyjx/3fLedVI57srjBDDxxGgOWe ¿Que son las transportadoras?.