OCA’S SHIPPING MODULE – MAGENTO 2
Magento 2.2 and 2.3 Open Source and Commerce Edition
INSTALATION GUIDE
- Go to Magento root and copy the code in app/code/.
- It should read [magento_root]/app/code/Oca/TrackEPak
- Run the following commands in Magento:
- $ bin/magento setup:upgrade
- $ bin/magento setup:di:compile
- $ bin/magento setup:static-content:deploy
- Enable the module on the Admin
- Access to the store’s Admin.
- Access to Store -> Settings
- Access to Sales -> Shipping Methods
- Select Oca’s Module and enable it.
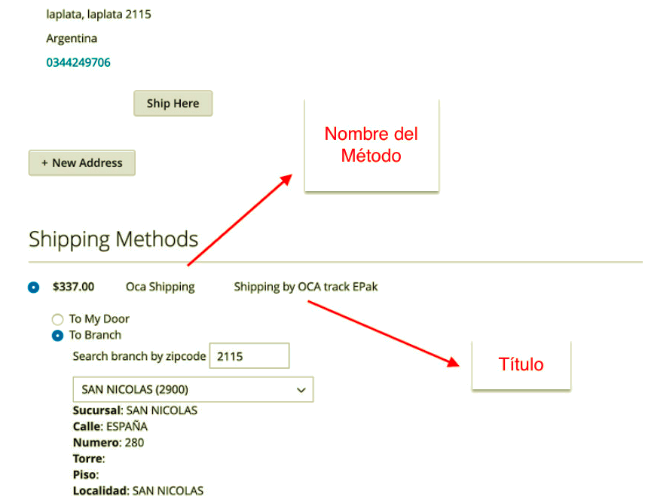
- Description of the options
- Title: Title that will appear on the checkout
- Method Name: Name of the method that will appear on the checkout
- Shipping Cost: In case of using a fixed cost for all the locations (by selecting this option, all the costs will be calculated by OCA)
- Type: Calculate the cost according to item, complete order or none of them (in case of using a fixed cost)
- Use Flat Rate instead of Calculate from API: Seleccionar TRUE para que calcule los precios desde la API de OCA
- Ship to Aplicable Countries: No cambiar
- Ship to Specific Countries: No cambiar
- Tracking URL: URL de OCA para seguir el tracking de los envíos, no cambiar.
- SOAP Epak Tracking URL: OCA’s API. Do not change it.
- SOAP Oep Tracking URL: OCA’s API. Do not change it.
- OCA CUIT: The CUIT of the branch.
- OCA Username: Name of the account to be authenticated by OCA./li>
- OCA Password: Password to be authenticated by OCA.
- Account Number: OCA’s account number
- Operatory: Operatory Number registered by OCA.
- All the products must indicate Width, Height and Length. Otherwise, an option must be configured by default: Go to Store-> Settings -> Configuration -> OCA -> Dimension and set the three of them with one option by default, in meters. Minimum 0.01.

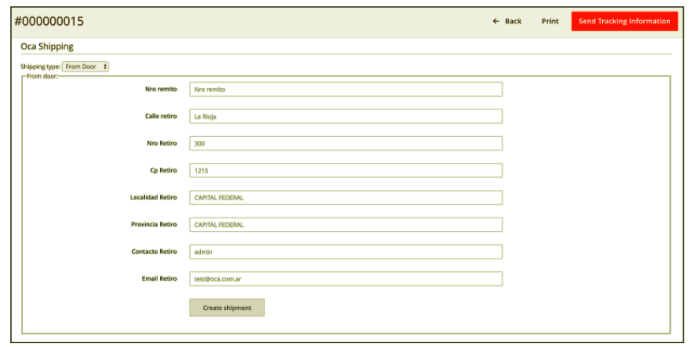
SHIPPING CREATION ON THE ADMIN
Conditions:
- The order must have been created using OCA as shipping method.
- The Admin User must access to the order’s shipping detail
- The shipping has not been yet generated .
- The store’s administrator must decide whether OCA picks up the item(s) from a specific location or delivers the item(s) at an OCA’s branch store.
Steps:
- In case of deciding that OCA picks the item up, select “From Door” at Shipping Type and fill in the information. Once the information is provided, click on “Create shipping”
- In case of deciding using an OCA’s branch store, you must place a Zip-Code in the “zip code” field and then click on “Get Branch Nearest” in order to get a list of the branch stores close to the Zip-Code.
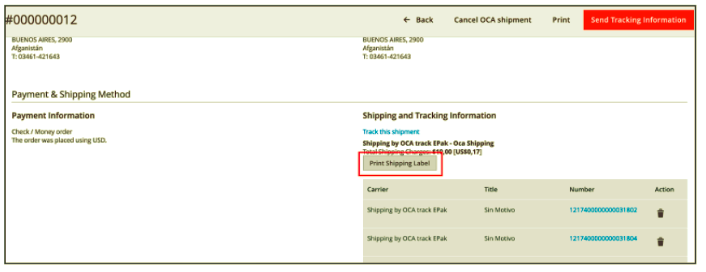
SHIPPING CANCELLATION
Conditions:
- The shipping was created.
- The administrator user is on the page of the shipment’s details.
Steps:
- Click on “Cancel OCA Shipment” to cancel the shipment on the OCA’s API.

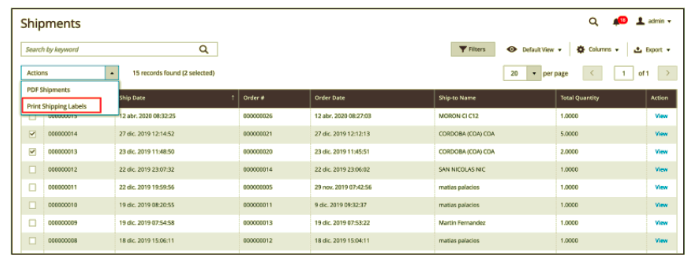
LABEL PRINTING
With the administrator user on the shipment grid:
- Select the shipments to be printed.
- In Actions, select Print Shipping Labels.
With the administrator user on the shipment’s details page:
- Click on Print Shipping Label
At the Frontend: